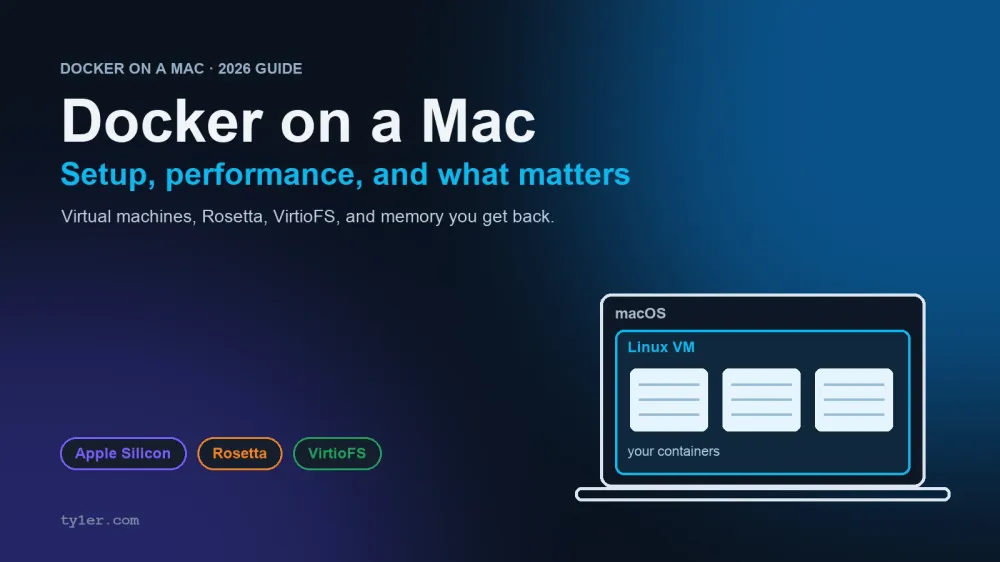
Docker on a Mac feels like Docker anywhere else: the same commands, the same Compose files, the same images. Under the hood it's doing something quite different, and almost every Mac-specific problem — slow file syncing, Intel images that crawl, a laptop that feels sluggish the moment Docker starts — traces back to that one difference.
This guide covers setting Docker Desktop up well on a Mac, with Apple Silicon as the main case: what the defaults actually do, the virtualization choice that just changed in 2026, running Intel images, tuning resources, and making file sharing fast. Every log line, terminal screenshot, and timing in this post is real, captured live from Docker Desktop 4.90 on a 16 GB Apple M3 running macOS 26.2.
For quick-reference commands, see the Docker for macOS cheatsheet. For Docker itself — Dockerfiles, Compose, the CLI — see the Docker cheatsheet.
The one fact that explains everything
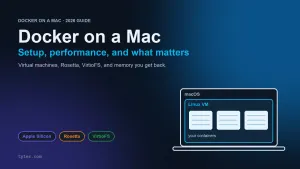
Containers are a Linux kernel feature. macOS doesn't have that kernel, so there's no such thing as a native Mac container. Docker Desktop's real job is running a small Linux virtual machine and hiding the seams between it and your Mac.
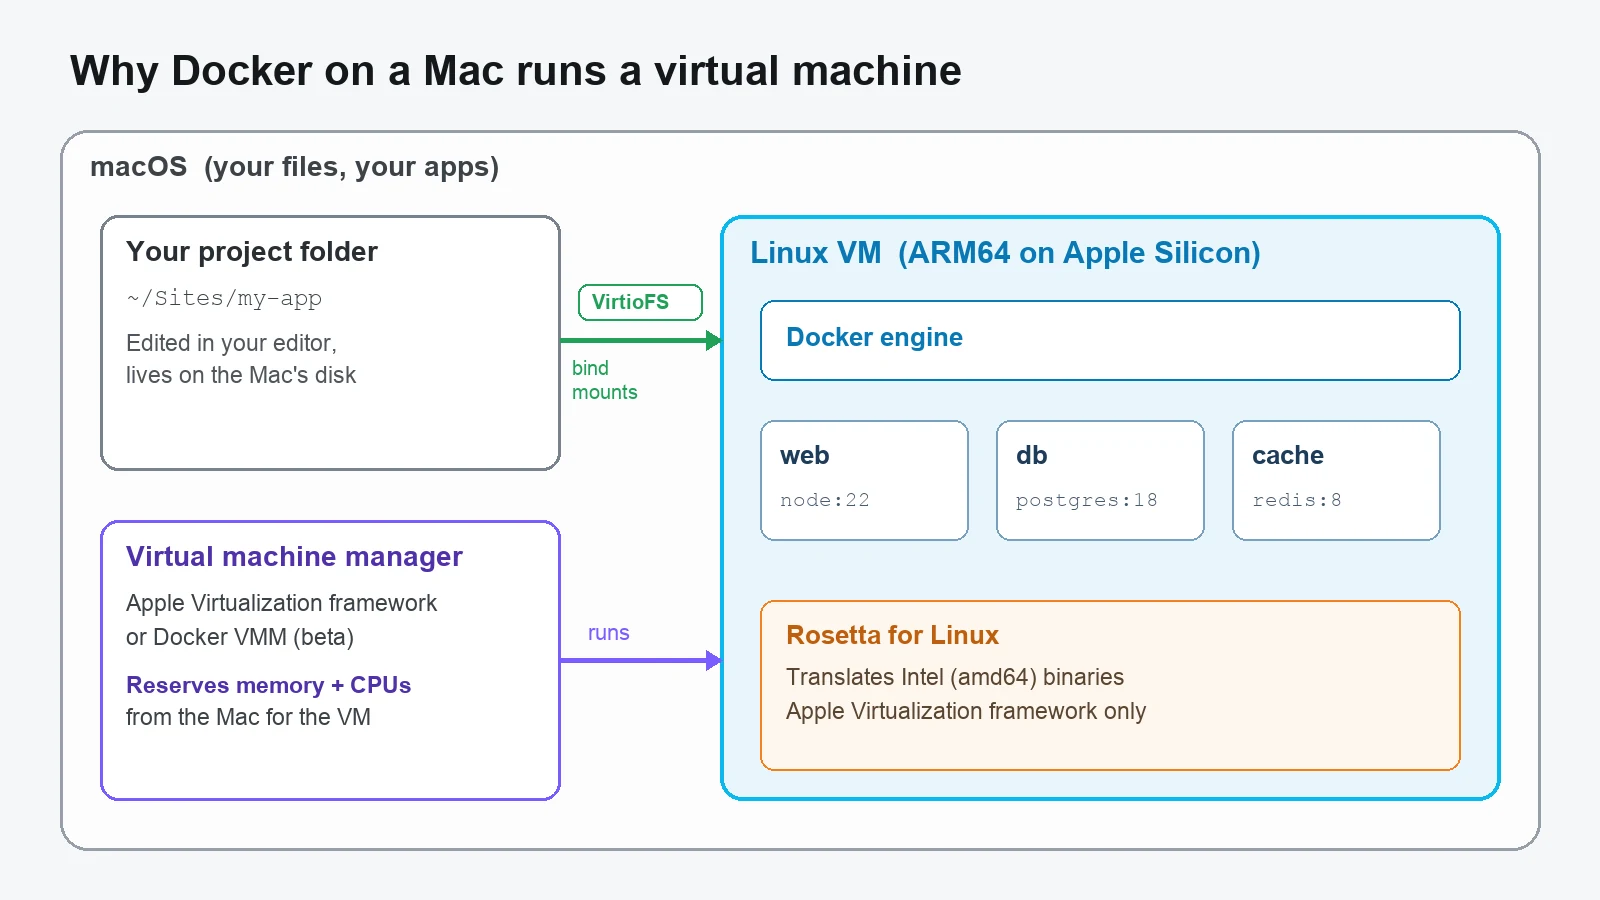
- Your files live on macOS, your containers live in the VM. Every bind mount crosses that boundary, which is why file-heavy work can be slower than on Linux.
- The VM needs memory and CPU of its own, reserved from your Mac. That's why Docker's resource settings matter far more on a Mac than on a Linux server.
- The VM runs ARM Linux on Apple Silicon. Intel-only images must be translated, either by Apple's Rosetta or by a much slower emulator.
What Docker Desktop actually does on first start
Docker Desktop writes a log line for each decision it makes when it boots the VM. Here's what it chose on a 16 GB, 8-core M3 with nothing configured:
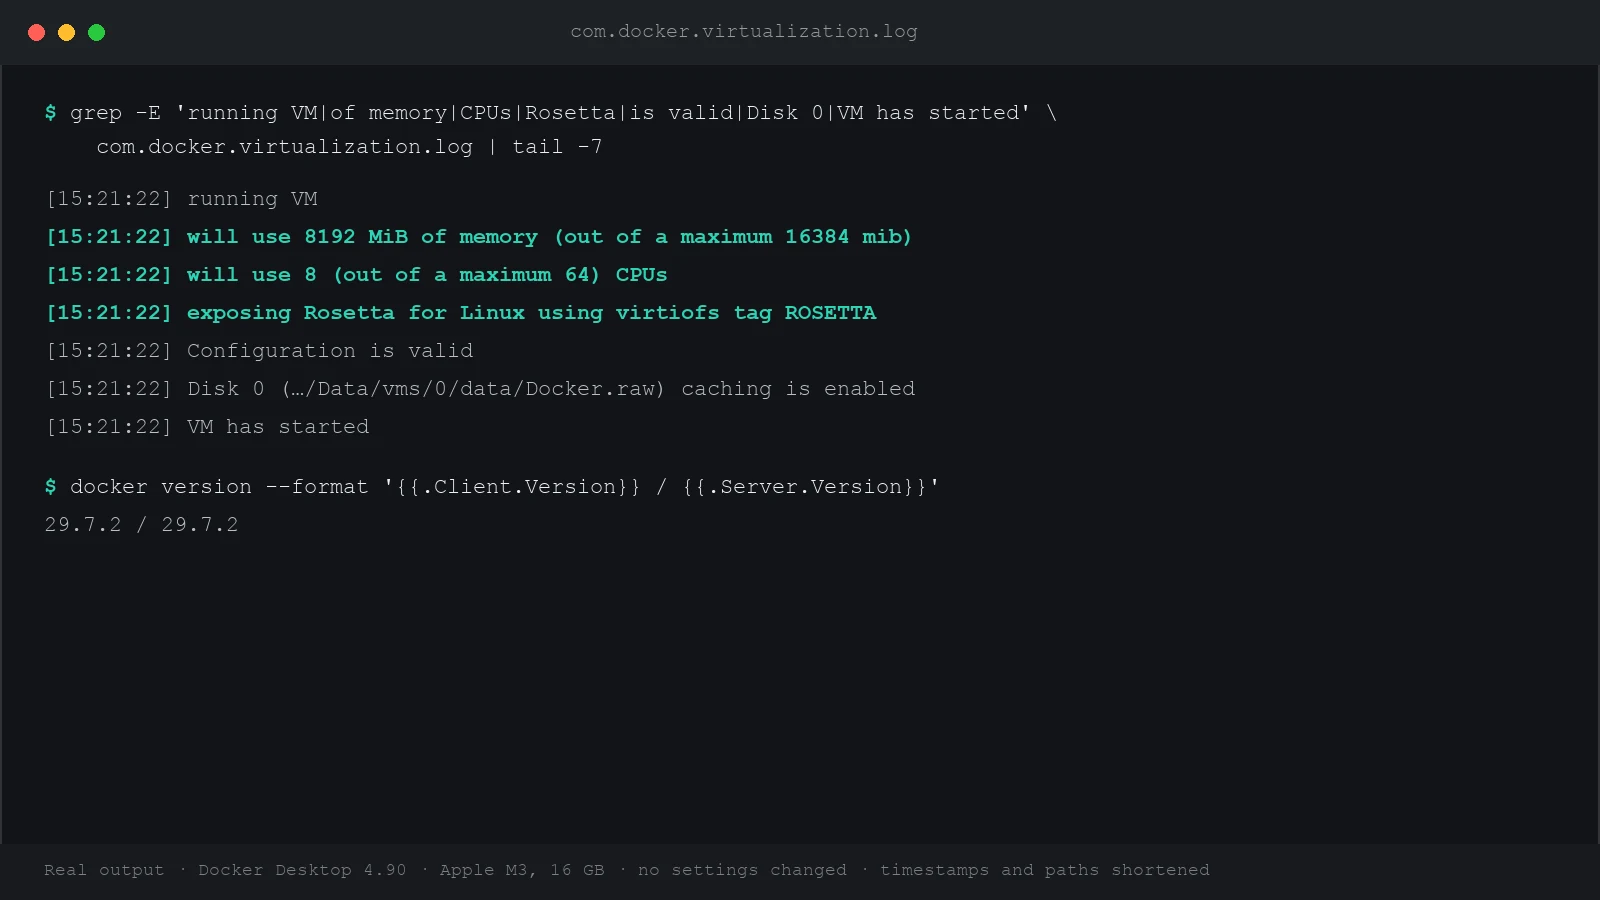
By default, the VM reserves half your RAM and every CPU core. That's a safe default for Docker, and a greedy one for your Mac — especially if you also run a browser, an editor, and anything else memory-hungry, like a local AI model. You'll trim both in step 4.
Once it's running, docker info confirms it from inside: the VM reports 8 CPUs and about 7.7 GB of memory. You can find the same log lines on your own Mac in ~/Library/Containers/com.docker.docker/Data/log/host/com.docker.virtualization.log.
Step 1: Install the right build
Check your chip first — arm64 means Apple Silicon, x86_64 means Intel:
uname -mDownload the matching installer from docker.com, drag Docker to Applications, and launch it once. Or use Homebrew, which picks the right build for you:
brew install --cask docker
open -a Docker
docker run hello-world
docker context ls        # the active context should be desktop-linux
Docker Desktop needs macOS 13 or newer in practice — Docker supports the current macOS release plus the two before it — and at least 4 GB of RAM, though you'll want far more headroom than that.
Step 2: Choose a virtual machine manager (this changed in 2026)
Under Settings → General, Docker Desktop lets you choose which virtual machine manager runs the Linux VM. That choice got more interesting this year:
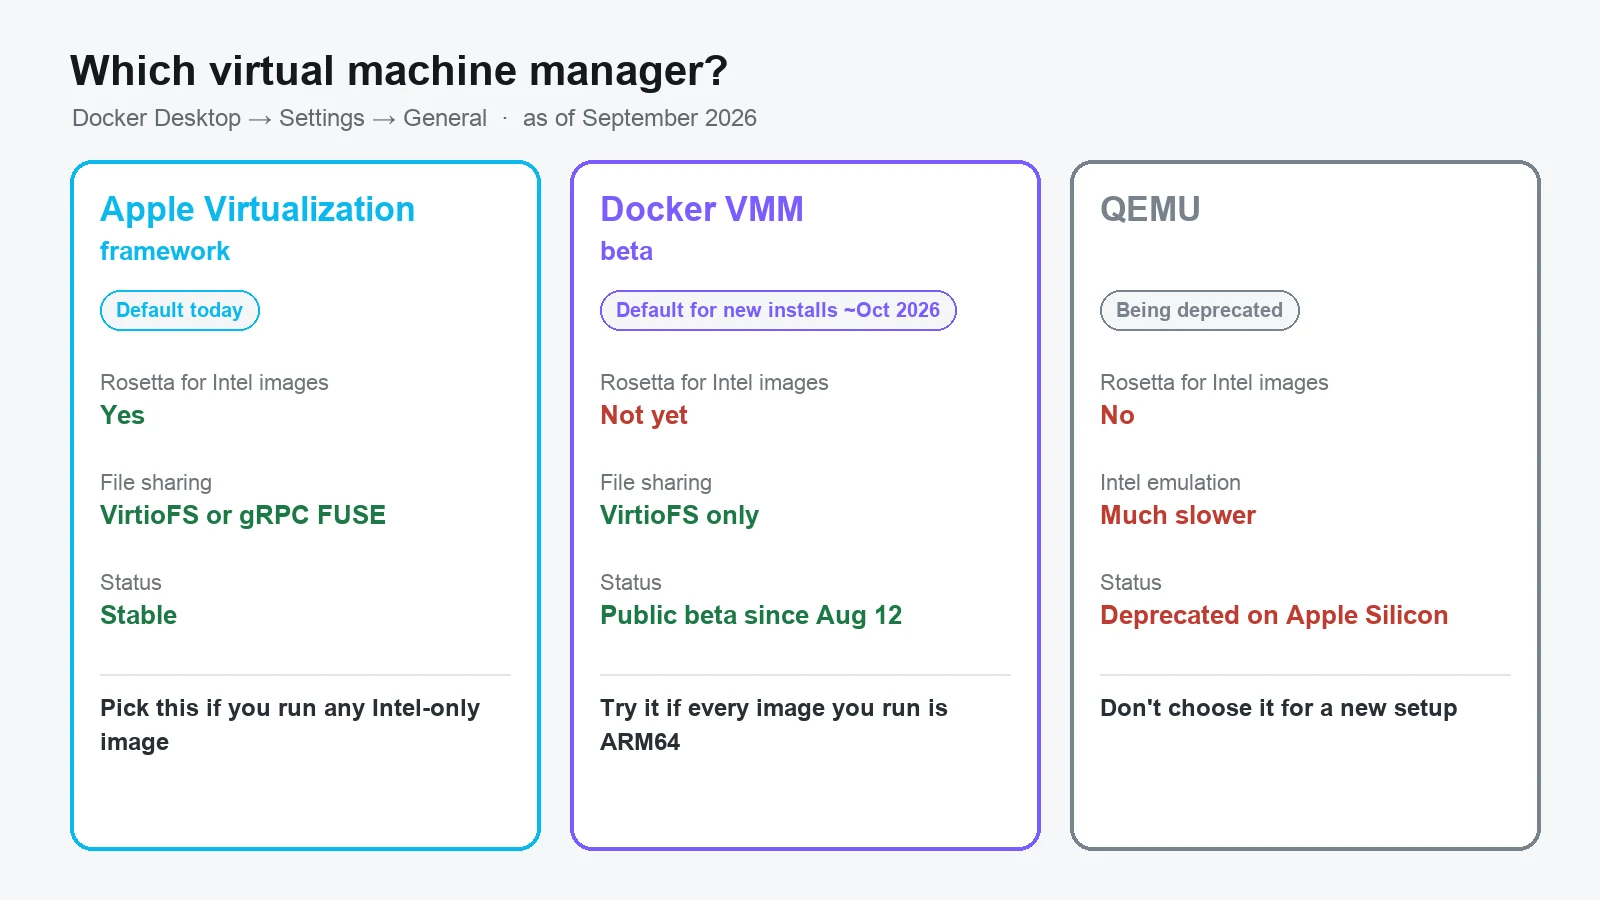
- Apple Virtualization framework is the current default and the safe choice. It's the only option that supports Rosetta, which matters if you run any Intel images.
- Docker VMM is Docker's own hypervisor. It's been in public beta since August 12, 2026, and Docker plans to make it the default for new installs around the end of October 2026. It's tuned for container workloads and removes some slowdowns of the Apple framework, but for now it doesn't support Rosetta, and VirtioFS is its only file-sharing option.
- QEMU is being deprecated on Apple Silicon. Don't choose it for a new setup.
A practical rule: if every image you run has an ARM64 build, try Docker VMM. If you depend on even one Intel-only image, stay on the Apple Virtualization framework until Docker VMM gains Rosetta support.
Step 3: Running Intel images on Apple Silicon
Most popular images publish ARM64 builds now, so they run natively. For one that doesn't, enable Settings → General → Use Rosetta for x86_64/amd64 emulation on Apple Silicon, then ask for the Intel build explicitly:
# Does this image have an ARM64 build at all?
docker manifest inspect mysql:8 | grep architecture

# Run the Intel build under emulation
docker run --platform linux/amd64 mysql:8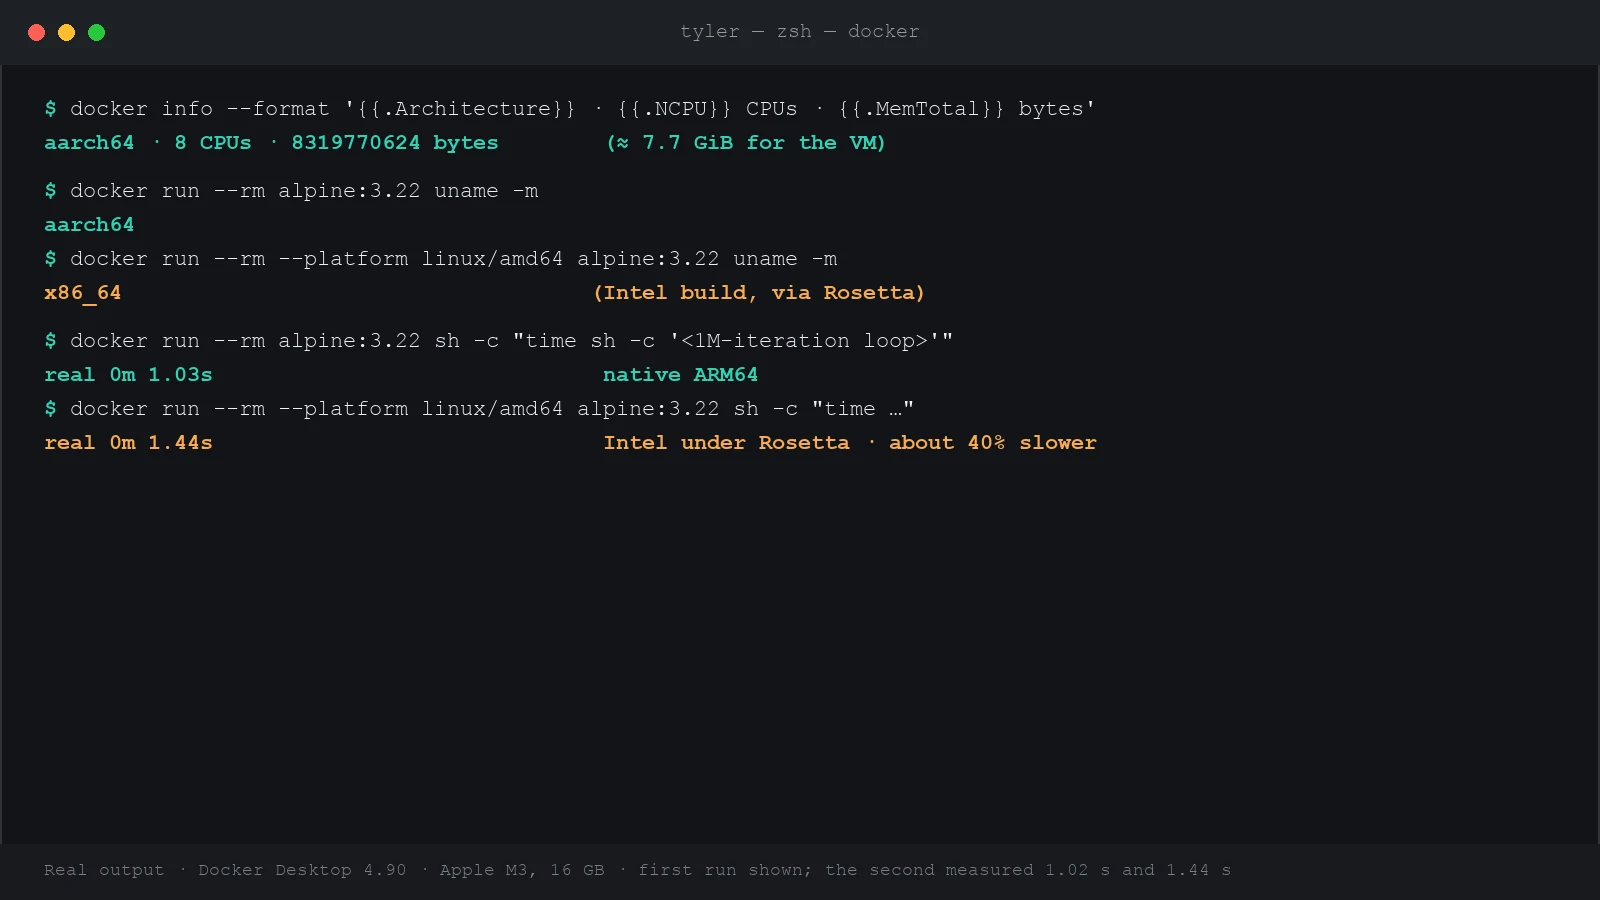
On this M3, a CPU-bound loop took 1.03 and then 1.02 seconds natively, and 1.44 seconds both times as an Intel build under Rosetta — about 40% slower. That's very usable. The fallback emulator is far worse: one independent comparison measured Rosetta at roughly 20% slower than native against roughly 85% slower for QEMU. Your numbers will vary by workload, but native ARM64 images are always the fastest option.
If you build the image yourself, the better fix is a multi-architecture image, so every machine runs it natively:
docker buildx build --platform linux/amd64,linux/arm64 -t you/app:latest --push .Step 4: Give the VM what it needs, not what it wants
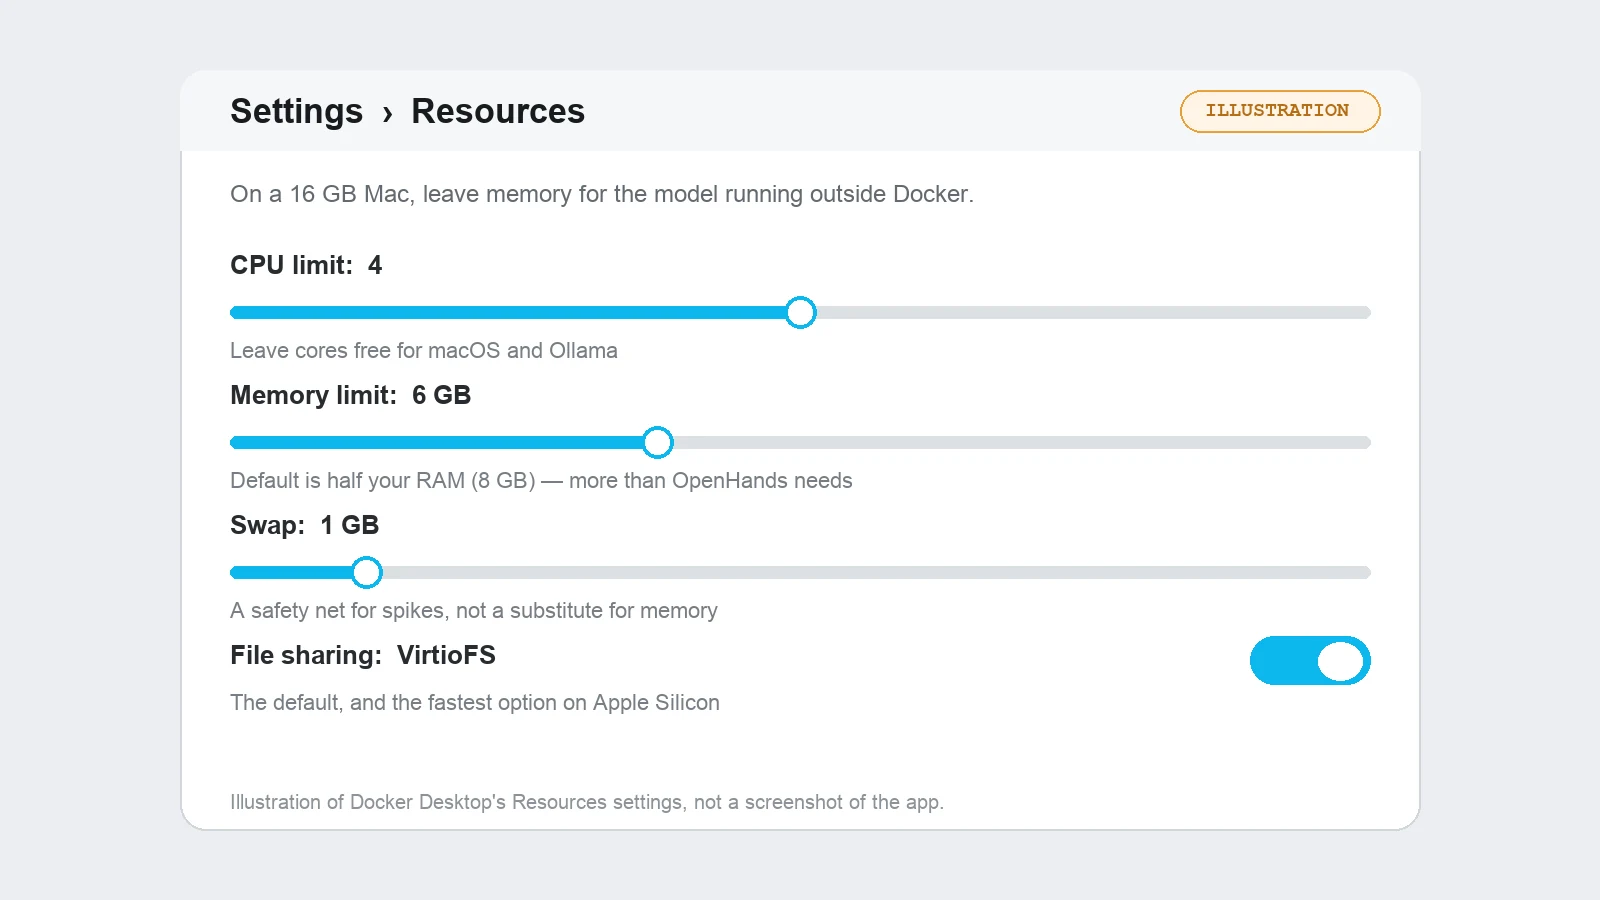
Open Settings → Resources:
| Setting | Default | A good starting point on 16 GB |
|---|---|---|
| Memory limit | Half your RAM (8 GB) | 4–6 GB for typical web development; raise it for databases or search engines |
| CPU limit | All cores | Leave 2 cores free for macOS |
| Swap | 1 GB | Leave it; it's a safety net, not extra memory |
| Disk usage limit | Large | Set a cap if your drive is small |
Memory reserved for the VM isn't available to macOS, whether containers use it or not. If your Mac slows down whenever Docker is running, this is almost always why. Check Activity Monitor's memory pressure graph: if it turns yellow or red with Docker up, lower the limit.
Step 5: Make file sharing fast
Bind mounts — mounting a folder from your Mac into a container — are the one place a Mac is genuinely slower than Linux, because every file operation crosses from macOS into the VM. Docker's VirtioFS file sharing, the default on modern Macs, closed most of that gap; Docker's own figure is up to 98% faster filesystem operations than the older implementation.
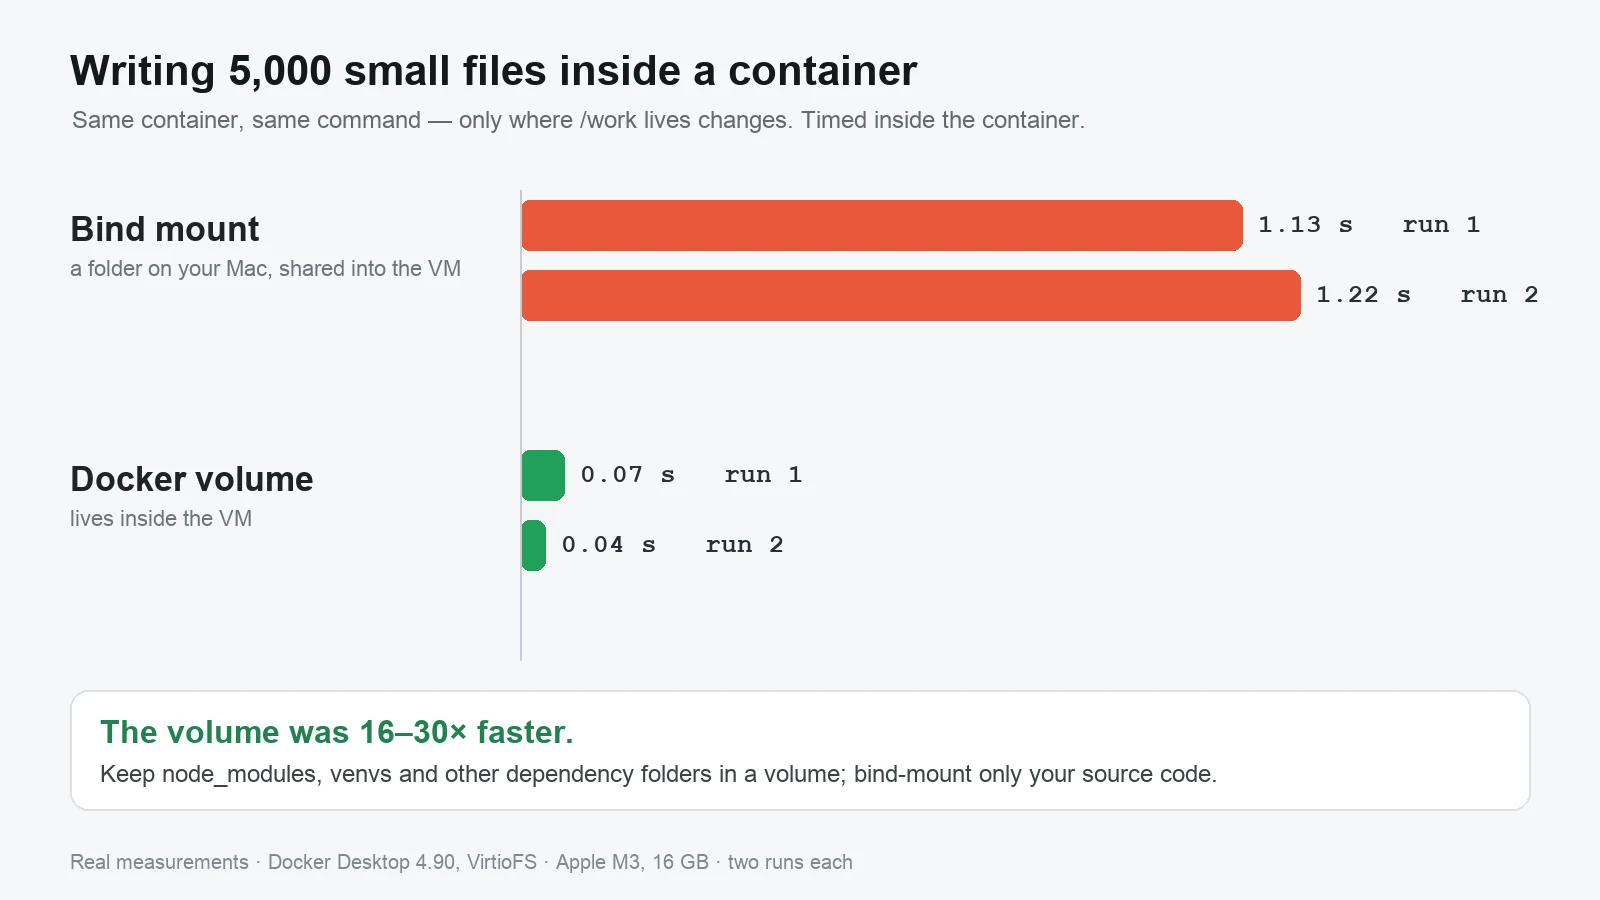
How much does it still matter? Writing 5,000 small files took 1.13 and 1.22 seconds on a bind mount, and 0.07 and 0.04 seconds on a Docker volume. That's 16 to 30 times faster. What remains hurts in one specific situation: tools that touch thousands of small files, like npm install, a Python virtual environment, or a file watcher on a large project. The fix is to keep those folders inside the VM, in a volume, while your source code stays bind-mounted:
services:
  web:
    build: .
    volumes:
      - .:/app                 # your source code, editable from the Mac
      - node_modules:/app/node_modules   # dependencies stay inside the VM
volumes:
  node_modules:
You still edit code on your Mac and see changes instantly, but the heavy dependency folder never crosses the file-sharing boundary. Older guides suggest :cached or :delegated mount flags; those were for the old file-sharing system and do nothing with VirtioFS.
The bug that only shows up in production
macOS file systems are case-insensitive by default, while Linux is always case-sensitive. An import of ./Utils.js that points at a file named utils.js can work on your Mac and fail on a real server. Docker Desktop enforces the correct case through the shared mount to catch this early. If you see a "file not found" for a file that clearly exists, check the capitalization first.
Step 6: Keep disk usage under control
Docker's VM stores images, containers, volumes, and build cache in one large disk file, and it only grows. Check what's using the space:
docker system df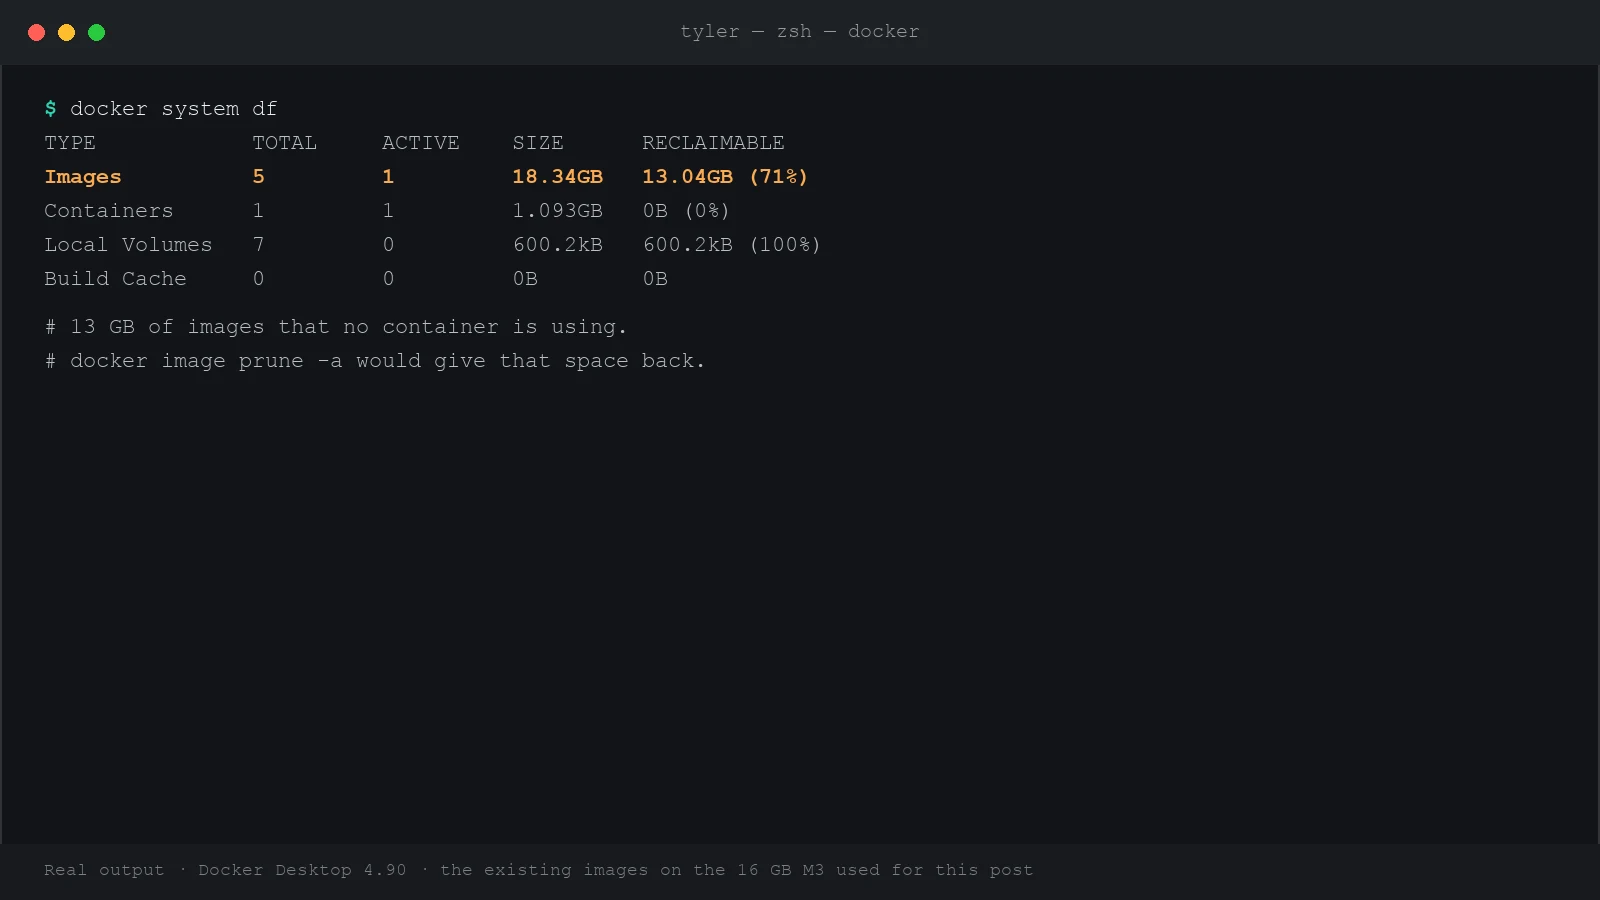
On the Mac used for this post, that showed 18.3 GB of images, 13 GB of them unused by any container. Reclaim space starting with the safest option:
docker builder prune                    # build cache only
docker image prune -a                   # images no container is using
docker system prune -a --volumes        # everything unused, including volumes
Be careful with the last one. --volumes deletes data in any volume not attached to a running container, including a stopped database. Run the first two regularly and the third only when you're sure.
A note on licensing
Docker Desktop is free for personal use, education, non-commercial open source, and small businesses with fewer than 250 employees and less than $10 million in annual revenue. Commercial use at a larger company needs a paid subscription. The Docker engine itself, and the command-line tools, stay open source; the license applies to the Desktop app.
Alternatives worth knowing
All of these give you the same docker command, so your Compose files keep working. Only the VM underneath changes.
| Tool | Cost | Why pick it |
|---|---|---|
| Docker Desktop | Free under the terms above | The official app, with the widest compatibility and Docker's own tooling |
| OrbStack | Free for personal use; paid for commercial | A native Mac app with very fast startup and file sharing; the closest drop-in replacement |
| Colima | Free, open source | Command-line only, no GUI; easy to script: brew install colima docker && colima start |
Apple's container tool | Free, open source | Apple's own runtime for macOS 26, running each container in its own lightweight VM; newer and less mature |
Troubleshooting
| Symptom | Likely cause and fix |
|---|---|
exec format error | An Intel-only image running without emulation. Add --platform linux/amd64 and turn on Rosetta. |
| Intel images are very slow | You're on Docker VMM, which has no Rosetta yet, or Rosetta is switched off. Use the Apple Virtualization framework with Rosetta enabled. |
| Mac slows down when Docker runs | The VM's memory reservation. Lower it under Resources. |
| npm install or file watching is slow | Dependencies on a bind mount. Move them into a volume, as in step 5. |
| Cannot connect to the Docker daemon | Docker Desktop isn't running, or the context changed. Open Docker, then run docker context use desktop-linux. |
| Container networking breaks on VPN | A known clash between some corporate VPN clients and the VM's network. Check Docker Desktop's network settings, or ask your IT team for a split-tunnel exception. |
The short version
- Install the build for your chip, and confirm it with
docker run hello-world. - Stay on the Apple Virtualization framework with Rosetta on if you use any Intel images. Try Docker VMM if everything you run is ARM64.
- Lower the memory and CPU limits so your Mac keeps some for itself.
- Keep dependency folders in volumes, not bind mounts.
- Prune regularly, and be careful with
--volumes.
To run a local AI coding agent on top of this setup, see Run a Private AI Coding Agent on Your Mac.