
Git is the tool that tracks every change to your files. GitHub is where those changes get shared, reviewed, and merged. You can do all of it from a terminal, and that's what this guide teaches: 100 short lessons, each one a single idea and the command that goes with it.
They build on each other, from installing Git to merging pull requests and tracking down bugs. If you're new, go in order; if you're not, skim the section headings and jump in. Every command was run on this Mac against Git 2.54 and GitHub CLI 2.97. Replace placeholders like OWNER/REPO, YOU, and a1b2c3d (a commit hash) with your own.
Setup: get Git and GitHub ready (1–10)
Do these once per computer. Everything after this assumes they're done.
- Install Git. On a Mac, running
git --versionthe first time offers to install Apple's Command Line Tools, which include Git. Homebrew gives you a newer release.brew install git git --version - Tell Git your name. Every commit is stamped with a name. Use the one you want teammates to see.
git config --global user.name "Ada Lovelace" - Tell Git your email. Use the email on your GitHub account so commits link to your profile. To keep it private, GitHub's Settings → Emails → Keep my email addresses private gives you an
ID+USERNAME@users.noreply.github.comaddress to use here instead.git config --global user.email "ada@example.com" - Name your default branch main. New repositories will start on
main, matching what GitHub creates.git config --global init.defaultBranch main - Pick your editor. Git opens an editor for merge messages and interactive rebases.
--waitmakes VS Code hand control back when you close the tab.nanoworks too.git config --global core.editor "code --wait" - See every setting and where it came from. When Git behaves strangely, this shows which config file is responsible for each value.
git config --list --show-origin - Use the built-in manual. The full manual for any command, or
-hfor a one-screen summary of its options.git help rebase git commit -h - Install the GitHub CLI.
ghbrings repositories, issues, pull requests, and Actions into the terminal.brew install gh gh --version - Sign in to GitHub from the terminal. Choose GitHub.com, pick HTTPS or SSH, and finish in the browser. No password ever gets typed into the terminal.
gh auth login - Check who you're signed in as.
gh auth setup-gitthen lets plaingit pushover HTTPS reuse the same login.gh auth status gh auth setup-git
Your first repository and commits (11–20)
The core loop: change files, choose what to save, save it.
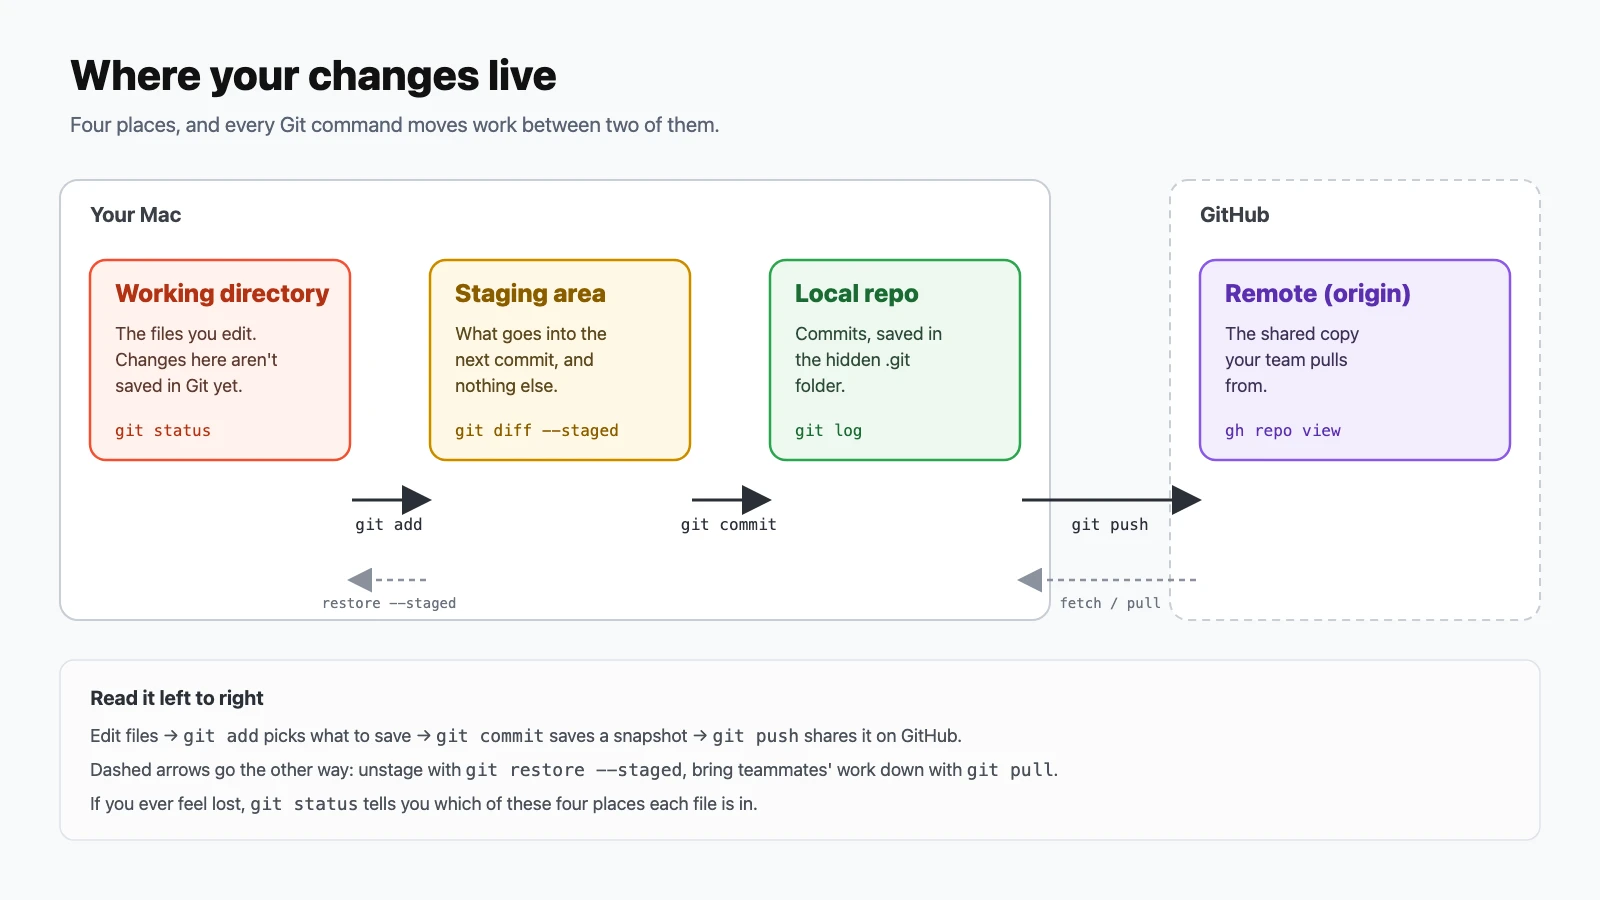
git add, git commit, and git push each move work one step to the right.- Start a repository.
git initcreates a hidden.gitfolder. That folder is the repository; delete it and the history is gone.mkdir my-project && cd my-project git init - Check status constantly. The most useful command in Git. It says what changed, what's staged, and which branch you're on.
-sbis the compact version.git status git status -sb - Stage one file. Staging marks a change to go into the next commit.
git add README.md - Stage everything, carefully.
git add .stages every change in the current folder and below;git add -Acovers the whole repository. Rungit statusfirst so a.envfile or a password doesn't come along for the ride.git add . git add -A - Stage part of a file.
-pwalks through each change and asks yes or no, so one file's unrelated edits can go into separate commits.git add -p - Commit. A commit is a permanent snapshot of everything staged, with a message saying why.
git commit -m "Add README" - Write messages that still make sense in a year. A short summary line in the imperative ("Fix", not "Fixed"), around 50 characters, then a blank line and the why if it isn't obvious. Running
git commitwith no-mopens your editor for exactly this.Fix login redirect loop on expired sessions The session check ran before the cookie refresh, so an expired token bounced users between /login and /home. - Skip staging for files Git already tracks.
-astages every modified or deleted tracked file, then commits. Brand-new files are not included; those still needgit add.git commit -am "Fix typo in README" - See unstaged changes. Line-by-line changes you haven't staged yet.
--statgives a one-line summary per file.git diff git diff --stat - See exactly what you're about to commit. Same idea, but for what's staged. Make this a habit right before every commit.
git diff --staged
Reading history (21–30)
Git remembers everything. These commands find it.
- Read the log. Every commit, newest first, with author, date, and message. Press
qto quit.git log - One line per commit. The short hash and summary line. The fastest way to get your bearings.
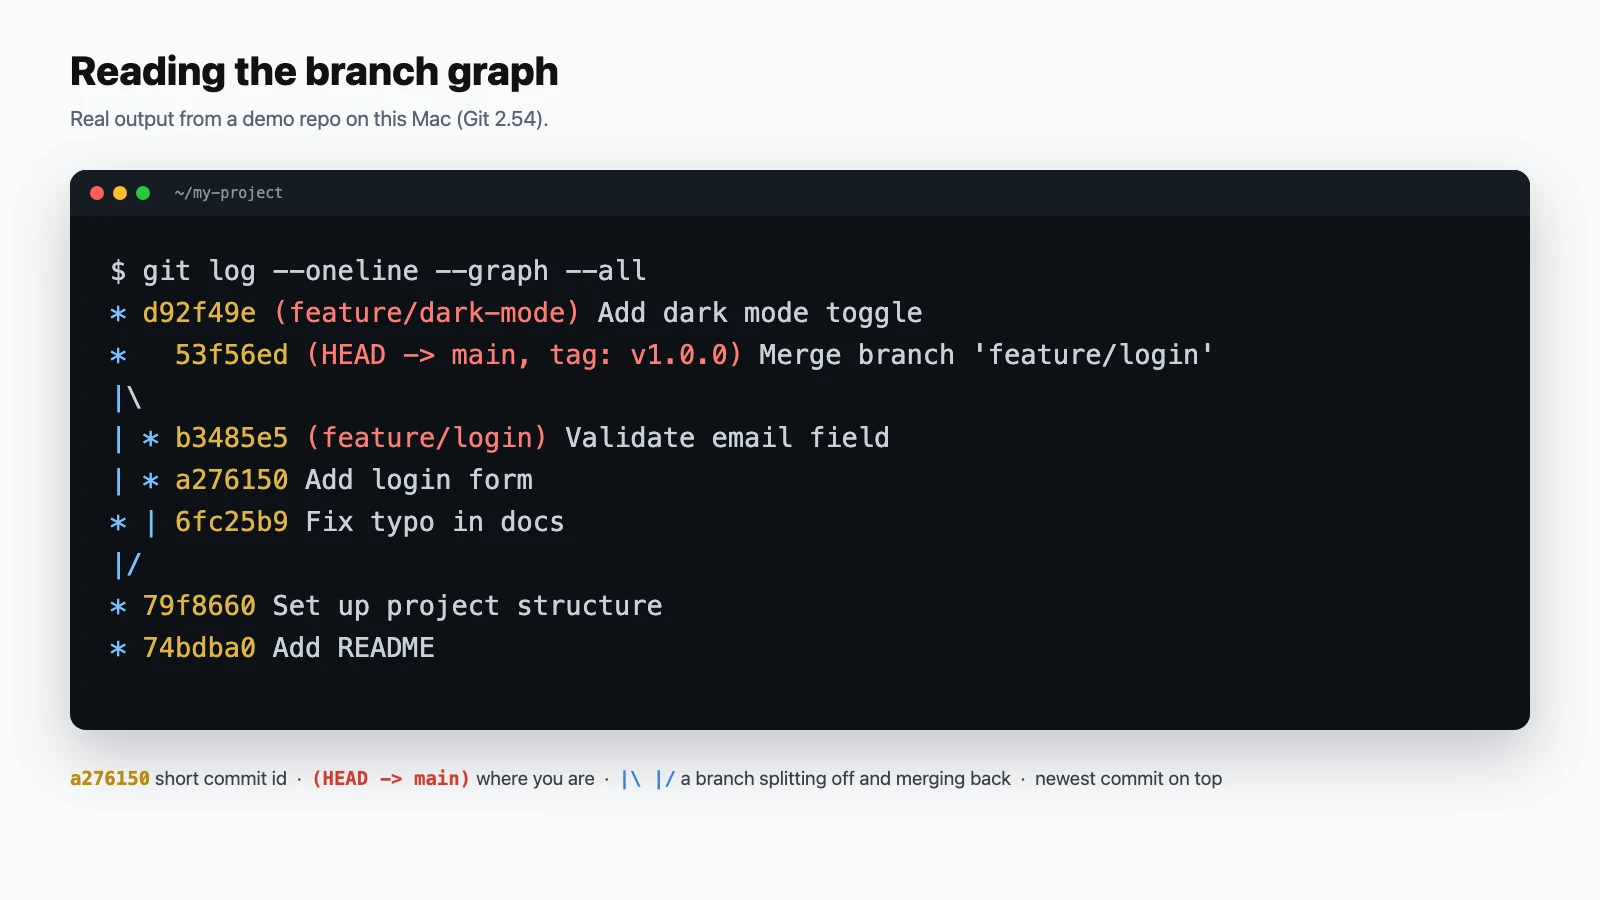
git log --oneline - Draw the branch graph. Shows how branches split and merged back together, across every branch.
git log --oneline --graph --all - Inspect a single commit. Message and full diff for one commit.
HEADmeans the commit you're currently on.git show a1b2c3d git show HEAD - Follow one file's history. Every change to one file, with diffs, and
--followkeeps going through renames.git log --follow -p -- src/app.js - Find who changed a line.
blameshows the commit and author behind each line.-Lnarrows it to a line range.git blame -L 10,20 src/app.js - Filter by author and date. Combine the two to answer "what did I do last sprint?"
git log --oneline --author="Ada" --since="2 weeks ago" - Find when some text appeared or vanished.
-S(the "pickaxe") finds commits that added or removed that string. Great for "when did this function disappear?"git log -S "validateEmail" --oneline - Search the code Git tracks. Faster than a plain
grepand skips untracked files.-nadds line numbers.git grep -n "TODO" - See who contributed. Commit counts per author, highest first.
git shortlog -sn
Undoing things safely (31–40)
Know which of these keep your work and which throw it away before you need them.
- Discard unsaved edits to a file. Puts the file back to how it was at the last commit. This deletes your edits permanently; there is no undo.
git restore src/app.js - Unstage a file. Takes it out of the next commit but keeps your edits in the file.
git restore --staged src/app.js - Pull one file from an older commit. Brings that version into your working directory without touching anything else.
git restore --source=HEAD~2 src/app.js - Undo a pushed commit with revert. Makes a new commit that reverses an old one. History is preserved, so it's the safe choice on any branch other people use.
git revert a1b2c3d - Undo the last commit, keep it staged. The commit disappears; its changes stay staged, ready to recommit.
git reset --soft HEAD~1 - Undo the last commit, keep the edits. The default mode: the commit disappears and its changes stay in your files, unstaged.
git reset HEAD~1 - Throw away the last commit completely. Commit and changes both gone. Only for work that was never pushed, and only when you're sure.
git reset --hard HEAD~1 - Recover almost anything with reflog. The reflog records everywhere
HEADhas been, including commits you "lost" to a reset. Find the hash and put it on a branch.git reflog git switch -c rescue a1b2c3d - Preview, then delete, untracked files.
-nis a dry run that lists what would go.-fddeletes untracked files and folders. Files in.gitignoreare left alone unless you add-x.git clean -n git clean -fd - Fix the last commit's message. Rewrites the most recent commit. Fine before you push; after pushing it rewrites shared history.
git commit --amend -m "Add login page"
Branches and merging (41–50)
A branch is a cheap, movable label. Make one for every piece of work.
- List branches. The
*marks the current one.-vvalso shows which remote branch each one tracks and whether you're ahead or behind.git branch git branch -vv - Create a branch and switch to it.
git switch(Git 2.23+) replaced the overloadedgit checkoutfor this job.git switch -c feature/login - Switch branches.
git switch -jumps back to whichever branch you were on before.git switch main git switch - - Merge a branch into main. Switch to the branch receiving the work, then merge the other one in.
git switch main git merge feature/login - Always record a merge commit. If main hasn't moved, Git fast-forwards and the branch leaves no trace.
--no-ffkeeps a merge commit so the feature stays visible in history.git merge --no-ff feature/login - Resolve a merge conflict. When both branches changed the same lines, Git stops and marks the file. Keep the version you want, delete the markers, then stage and finish.
<<<<<<< HEAD # Title B ======= # Title A >>>>>>> feature/title git add README.md git merge --continue - Back out of a merge. Returns everything to how it was before you started merging.
git merge --abort - Delete a merged branch.
-drefuses if the branch has unmerged work;-Ddeletes anyway.git branch -d feature/login - Rename a branch. With one name, renames the branch you're on.
git branch -m old-name new-name git branch -m new-name - See what's merged and what isn't. A quick way to find branches that are safe to clean up.
git branch --merged main
git branch --no-merged main
Working with remotes (51–60)
A remote is another copy of the repository, usually on GitHub, named origin by convention.
- Clone a repository. Downloads the whole repository and its history, with
originalready set. Use the SSH form once you've set up a key (lesson 69).git clone https://github.com/OWNER/REPO.git git clone git@github.com:OWNER/REPO.git - List your remotes. Shows each remote's name and URL.
git remote -v - Connect an existing repository to GitHub. For a repo you started locally with
git init.git remote add origin git@github.com:YOU/REPO.git - Push for the first time.
-ulinks your local branch to the remote one, so later pushes and pulls need no arguments.git push -u origin main - Push again. After the first push, this is all it takes.
git push - Fetch without merging. Downloads new commits but leaves your files alone. The second command lists commits on GitHub you don't have yet.
git fetch git log --oneline HEAD..origin/main - Pull teammates' work.
git pullis a fetch plus a merge.--rebasereplays your local commits on top instead, which keeps history in a straight line.git pull git pull --rebase - Make rebase the default for pull. Saves typing
--rebaseand avoids "Merge branch 'main' of github.com" commits.git config --global pull.rebase true - Clean out branches deleted on GitHub. Removes local references to remote branches that no longer exist. The config line does it on every fetch.
git fetch --prune git config --global fetch.prune true - Force-push the safe way. After rewriting your own branch's history, a normal push is rejected.
--force-with-leaseoverwrites it only if nobody else pushed in the meantime. Never use plain--forceon a shared branch.git push --force-with-lease
GitHub from the terminal (61–70)
Everything you'd click on github.com for a repository, done with gh.
- Publish a local folder as a new repo. Creates the repository on GitHub, adds it as
origin, and pushes, all in one line.gh repo create my-project --private --source=. --remote=origin --push - Create a repo and clone it. For starting fresh rather than from an existing folder.
gh repo create my-new-repo --public --clone - Clone by name. No URL to copy;
OWNER/REPOis enough.gh repo clone OWNER/REPO - Fork and clone in one step. Makes your own copy on GitHub, clones it, and adds the original as a second remote called
upstream.gh repo fork OWNER/REPO --clone - Open the repo in your browser. Jumps straight to the current repository's GitHub page.
gh repo view --web gh browse - Read a README without leaving the terminal. Shows the description and renders the README.
gh repo view OWNER/REPO - List your repositories. Add an owner name to list an organization's repos instead.
gh repo list --limit 20 - Keep a fork up to date. Updates your fork on GitHub from its parent; then pull to bring it down locally.
gh repo sync YOU/REPO git pull - Create an SSH key and add it to GitHub. SSH keys replace typing credentials for
git push. One key per computer, with a title you'll recognize later.ssh-keygen -t ed25519 -C "ada@example.com" gh ssh-key add ~/.ssh/id_ed25519.pub --title "My Mac" - Test the SSH connection. A success message names your GitHub account. More detail on keys in the SSH cheatsheet linked at the end.
ssh -T git@github.com
# Hi USERNAME! You've successfully authenticated, but GitHub does not provide shell access.
Issues and pull requests (71–80)
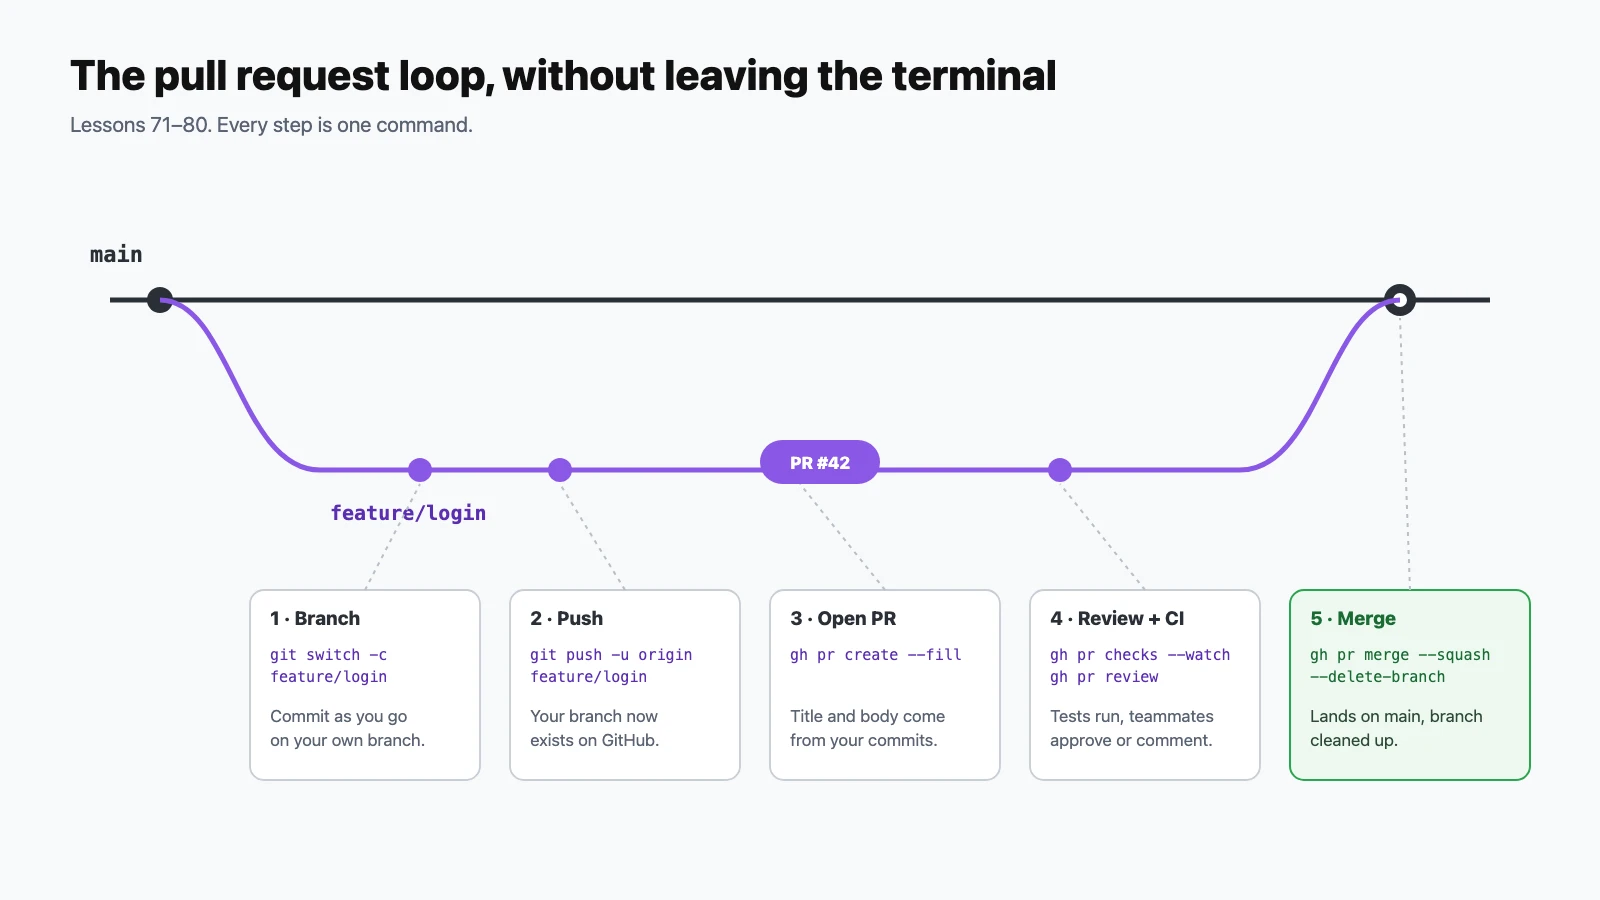
Where Git becomes teamwork. The figure shows how lessons 73–80 fit together.
- Open an issue. Leave
--titleoff andghasks for each field interactively.gh issue create --title "Login fails on Safari" --body "Steps to reproduce: ..." - Find issues. Filter by label, or show only the ones assigned to you.
gh issue list --label bug gh issue list --assignee "@me" gh issue view 12 --comments - Push your feature branch. A pull request compares a branch on GitHub against
main, so the branch has to be there first.git push -u origin feature/login - Open a pull request.
--filltakes the title and description from your commits.gh pr create --fill - Open it as a draft. Signals "not ready for review yet" while CI still runs. Mark it ready when it is.
gh pr create --fill --draft gh pr ready - See open pull requests.
statusfocuses on yours: what you opened and what's waiting on your review.gh pr list gh pr status - Check out someone else's pull request. Fetches their branch so you can run it locally. Works for PRs from forks too.
gh pr checkout 42 - Review a pull request. Read the diff, then approve, request changes, or leave a comment.
gh pr diff 42 gh pr review 42 --approve --body "Looks good" gh pr review 42 --request-changes --body "See inline notes" - Watch the checks. Shows each CI check's status and keeps updating until they finish.
gh pr checks --watch - Merge and clean up. Squash merging turns the PR into one commit on main;
--delete-branchremoves the branch locally and on GitHub.gh pr merge --squash --delete-branch
Power tools (81–90)
Not daily commands, but each one saves an afternoon when you need it.
- Park unfinished work. Stashing tucks away uncommitted changes so you can switch branches cleanly.
-uincludes new files.git stash push -u -m "wip: login form" - Get stashed work back.
popreapplies the latest stash and removes it from the list;applykeeps a copy in the stash.git stash list git stash pop - Copy one commit onto your branch. Applies a single commit from anywhere, such as a bug fix someone made on another branch.
git cherry-pick a1b2c3d - Replay your branch on top of main. Moves your commits so they start from the latest
main, as if you'd branched off it today.git switch feature/login git rebase main - Tidy commits before review. Opens a list of the last four commits. Change
picktosquash,fixup,reword, ordropto combine, rename, or remove them.git rebase -i HEAD~4 - Mark a fix for an earlier commit.
--fixupmakes a commit labelled for a specific earlier one;--autosquashfolds it in automatically during the rebase.git commit --fixup a1b2c3d git rebase -i --autosquash main - Follow the golden rule of rebasing. Rebase rewrites commits. Do it freely on branches only you use. On a branch others have pulled, merge instead; if you rebased your own pushed PR branch, finish with
git push --force-with-lease.git push --force-with-lease - Get out of a rebase. After fixing a conflict, stage the file and continue. To give up, abort and you're back where you started.
git add README.md git rebase --continue git rebase --abort - Find the commit that broke something. Bisect binary-searches history. Mark a good and a bad commit, test what it checks out, and repeat.
runautomates it with any script that fails on the bug.git bisect start git bisect bad git bisect good v1.0.0 git bisect run npm test git bisect reset - Work on two branches at once. A worktree is a second folder checked out to a different branch, sharing the same repository. No stashing to fix something urgent.
git worktree add ../hotfix -b hotfix
git worktree remove ../hotfix
Habits and guardrails (91–100)
The settings and routines that keep a repository clean for years.
- Ignore files Git shouldn't track. List patterns in a
.gitignoreat the top of the repository and commit it. Dependencies, build output, secrets, and OS clutter are the usual entries.node_modules/ dist/ .env .DS_Store - Stop tracking a file you already committed. Adding a file to
.gitignoredoesn't untrack it.--cachedremoves it from Git but keeps it on disk. If it held a secret, it's still in history: rotate the secret.git rm --cached .env git commit -m "Stop tracking .env" - Ignore Mac junk in every repository. Git automatically reads a personal ignore file at
~/.config/git/ignore, so.DS_Storenever needs to appear in a project's.gitignoreagain.mkdir -p ~/.config/git echo .DS_Store >> ~/.config/git/ignore - Make shortcuts for long commands. After this,
git lgdraws the branch graph from lesson 23.git config --global alias.lg "log --oneline --graph --all" git lg - Tag a release. An annotated tag names a commit and records who tagged it and when. Tags aren't sent by a plain
git push; push them by name.git tag -a v1.0.0 -m "First release" git push origin v1.0.0 - Publish a GitHub release. Turns a tag into a release page, with notes generated from the merged pull requests.
gh release create v1.0.0 --generate-notes - Watch GitHub Actions runs. List recent workflow runs, follow one live, or print just the log of the step that failed.
gh run list gh run watch gh run view --log-failed - Run checks before every commit. An executable file at
.git/hooks/pre-commitruns on each commit, and a non-zero exit stops it. Hooks aren't copied when someone clones, so each person sets them up.#!/bin/sh # .git/hooks/pre-commit npm test chmod +x .git/hooks/pre-commit - Sign your commits. Git 2.34+ can sign with your existing SSH key, and GitHub shows a Verified badge once the key is added as a signing key.
git config --global gpg.format ssh git config --global user.signingkey ~/.ssh/id_ed25519.pub git config --global commit.gpgsign true gh ssh-key add ~/.ssh/id_ed25519.pub --type signing - Make the daily loop automatic. Most days are just this loop, repeated many times. Commit small, push often, and run
git statuswhenever you're unsure.git switch -c feature/x git status git add -p git commit -m "..." git push -u origin feature/x gh pr create --fill
Where to go next
You don't need all 100 at once. Lessons 11–20 and 51–55 cover most of a normal day; the rest are for when something specific comes up. Bookmark this page and look up the lesson when you need it.
For a searchable one-page reference of these commands and more, see the Git & GitHub cheatsheet. For SSH keys, config files, and connection troubleshooting, see the SSH cheatsheet.